On May 30th, 2022, Google retired Less Secure Apps and therefore stopped third-party apps and devices from signing in with only a normal username and password. What does this mean for your MFPs when it comes to scan-to-email? If you are using the popular Gmail SMTP service, you will be affected by this change.
What to do? There is a solution. To be able to continue scanning using a Gmail account as Sender/Authentication with Gmail SMTP settings, two things must be done to the account. 2 Factor authentication must be enabled, and an App Password will now be required for an MFP device.
Instruction to perform these two tasks is outlined below.
Step 1: Log into the Gmail account being used for Scan to Email in your Multi-Function Printer. **NOTE: This refers to the account that is used in the machine as the sender and authentication. Not to be confused with addresses that you scan documents to. To find this address, skip down to the Accessing SMTP section of the blog and find this address in your machine's SMTP settings.
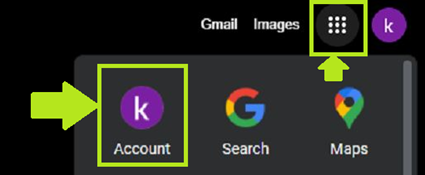
Step 2: Click on your Waffle icon (usually upper right side of screen) and then the Account icon.
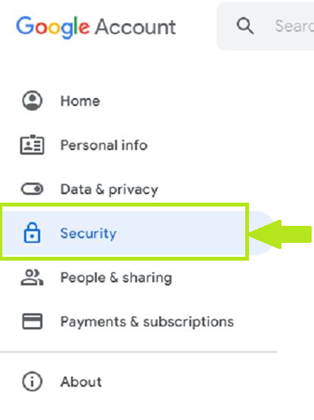
Step 3: Click on Security on the far-left side menu.
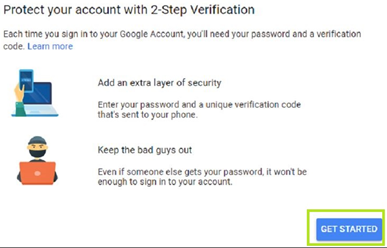
Step 4: Under Signing in to Google, click on 2-Step Verification (FYI, it is normal that you will have to enter your normal account password throughout many of these steps). And then click on Get Started on the next window.

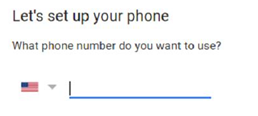
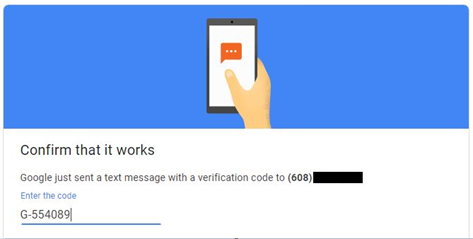
Step 5: Enter a phone number you would like to use for the process and choose to send it a security code. Enter the code in the next window and click Next to confirm.
Step 6: You should get a message: It worked! Turn on 2-Step Verification?. Click Turn On.
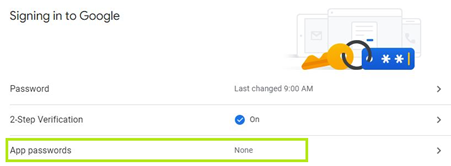
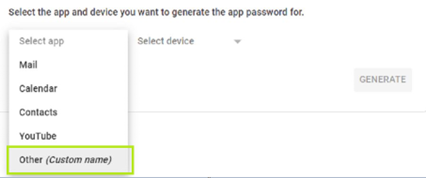
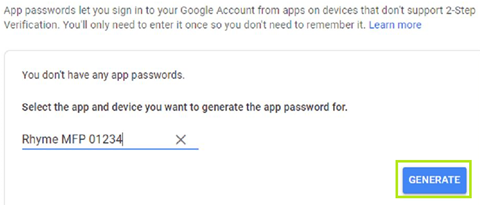
Step 7: Go back to the Security screen and to the Signing in to Google area. You will now see a choice for App passwords. Click that and it will bring you to the App Passwords screen. You will see an area to choose from either Select app or Select device. Grab the drop down for Select app and choose Other (Custom name) from the list.
APP PASSWORD >
Step 8: It's recommend to give it a name descriptive of the MFP it will be used for (e.g.: Front Desk Copier). Maybe include the asset ID number. Then click the Generate button.
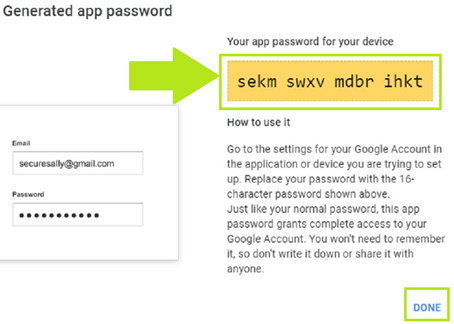
Step 9: You will see an auto-generated App password ready for use. This will be the password you will use in the SMTP settings of the MFP device in each case. Click Done.
Accessing SMTP (Scan to Email) settings to make changes and updates (Sharp, Kyocera and Xerox Devices)
Sharp Devices
Step 1) Find your MFP's IP address. For the newer series Sharp MFPs you will go through this path on the touchscreen:
Settings -> Status (tab) -> Network Status (left side menu) -> Use the far right scroll bar to scroll down to find the IPv4 address (Example: 192.168.x.x). Take note of the address.
Step 2) Go over to a computer on the same network (one that can print to that MFP), open an internet browser, and type the IPv4 address in the very top address bar. Hit enter on your keyboard. You will be presented with a Sharp webpage.
Step 3) Click Login in the upper-right corner. Default password = admin.
Step 4) Now that you are logged in as the administrator, click on System Settings (tab) -> Network Settings (button) -> Services Settings (left side menu) -> SMTP (tab).
Step 5) Make whatever adjustments are necessary. However, the focus may be on the SMTP Authentication area. If related to the recent Google/Gmail change, you will need to apply a new App Password that you created for the respective Gmail account.
Kyocera Devices
Step 1) Find your MFP's IP address. For Kyocera MFPs with a touchscreen, you will go through this path on screen:
Device Information -> Identification/Network -> IP Address IPv4. You will see an IP address (Example: 192.168.x.x). Take note of the address.
Step 2) Go over to a computer on the same network (one that can print to that MFP), open an internet browser, and type the IPv4 address in the very top address bar. Hit enter on your keyboard. You will be presented with a Kyocera CCRX webpage.
Step 3) In the Admin Login area enter the login credentials. Defaults: User Name = Admin. Password = Admin.
Step 4) Now that you are logged in as the administrator, click on Function Settings -> Email. This will automatically bring you to the SMTP settings.
Step 5) Make whatever adjustments are necessary. However, the focus may be on the Authentication Protocol area. If related to the recent Google/Gmail change, you will need to apply a new App Password that you created for the respective Gmail account.
Xerox VersaLink Devices
Step 1) Find your MFP's IP address. For Xerox VersaLink MFPs you will go through this path on the touchscreen:
Device -> About -> Scroll down to IPv4. You will see an IP address (Example: 192.168.x.x). Take note of the address.
Step 2) Go over to a computer on the same network (one that can print to that MFP), open an internet browser, and type the IPv4 address in the very top address bar. Hit enter on your keyboard. You will be presented with a Xerox VersaLink webpage.
Step 3) Click Log In in the upper-right corner. Default user = admin. Default password = 1111.
Step 4) Now that you are logged in as the administrator, click on Connectivity -> Scroll down to click on SMTP.
Step 5) Make whatever adjustments are necessary. However, the focus may be on the Outgoing SMTP Authentication area. If related to the recent Google/Gmail change, you will need to apply a new App Password that you created for the respective Gmail account.
Xerox AltaLink Devices
Step 1) Find your MFP's IP address. For Xerox AltaLink MFPs you will go through this path on the touchscreen:
Device -> About -> Scroll down to Network (area). You will see an IP address (Example: 192.168.x.x) for either Wired IPv4 Address or Wireless IPv4 Address. Take note of the address.
Step 2) Go over to a computer on the same network (one that can print to that MFP), open an internet browser, and type the IPv4 address in the very top address bar. Hit enter on your keyboard. You will be presented with a Xerox AltaLink webpage.
Step 3) Click Login in the upper-right corner. Default user = admin. Default password = 1111. Note: if you get a message about The default password for the admin account is still being used, click on Prompt at Next Login and proceed to Step 4.
Step 4) Now that you are logged in as the administrator, click on Connectivity -> Setup. Scroll down to SMTP (Email) and click on Edit
Step 5) Make whatever adjustments are necessary. However, the focus may be on the SMTP Authentication area. If related to the recent Google/Gmail change, you will need to apply a new App Password that you created for the respective Gmail account.
If you have any questions on these steps or process, feel free to reach out to us at 800-362-4333 or https://www.rhymebiz.com/Support.